|
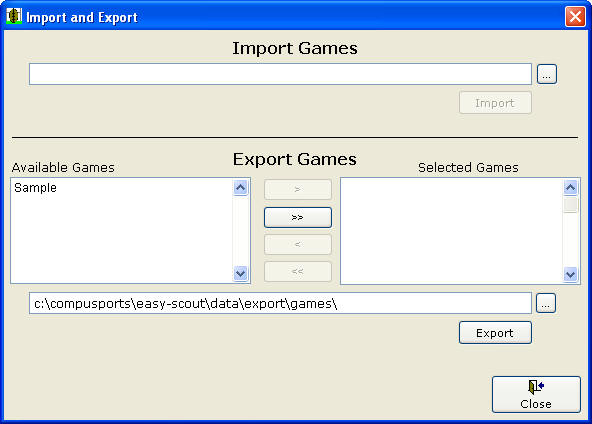
Importing and Exporting Games in Easy-Scout XP Plus The Import and Export functions work together to provide a means for saving and retrieving individual game data and moving it between computers. When a game is Exported, all plays from a game are copied to (exported) an individual game file, with one file created for each game. When a game is Imported, all plays from a previously Exported Game are copied from (imported) an individual game file and added to the games that are in the Easy-Scout database. The Import/Export function should not be confused with the Backup/Restore function, which copies the entire "game database" and a number of supporting data files. Import Use the upper portion of this screen to import a previously exported game. Click the Browse (...) button to locate a previously exported game and click OK. The game name will be inserted and the Import button will become active. Click the IMPORT button to complete the Import Process. If the game that is imported is not in the current Easy-Scout database, the game will be imported. However, if the game is already in the database, Easy-Scout will prompt the user to "Overwrite" or "Rename" the game. Select "Overwrite" to replace the existing plays for that Game Name in the Easy-Scout database with the plays from the imported file, or Select "Rename" and provide a new and unique game name to import the group of plays from the Import file into the database with a Different Game Name. Export Use the lower portion of the Import/Export screen to Export one or more games. Select one or more games with the "mover" - moving one or more games from the Available Games list on the left to the Selected Games list on the right. To move one game between these two lists, click on a game name to select the game and use the > button located between the two lists to move the game to the Selected List. To move more than one game, repeat the process of selecting and moving
individual games - building a list of Selected Games in the process. To remove games from the list, select one or more games and click the < or << button. Click the Browse (...) button to select the location for the Exported Games and Click OK. Click the Export button to complete the Export process. The game file(s) will be created and the Import/Export screen will return to its original state. To check the games that were exported, click the Browse (...) button in the upper (Import) section of the Screen and then click the Cancel button. Click the CLOSE button to complete the procedure of Importing and Exporting Games. |
